September 20, 2015, 4:28 am
If I had never built up my interest in blogging, then I think I wouldn't have been introduced to so many delicious and interesting recipes, from different parts of the world or even the country/ state I belong to. This is one such snack I had never had or heard about. Blogging introduced me to this snack and I am glad that it did.
The favorite snack with Ethakka/Nenthrapazham towards our part of Kerala has been theEthakka Boil/ Pazham pori. So every time I see ripen Ethakka, the only thought that would cross my mind is to make Ethakka Boli out of it. But after trying Unnakaya, this has been a close second option to make with Ethakka.
They are super good with the crunchiness of coconut inside and random bites on the ghee fried cashews and raisins. Yumm.. If you have never heard of it before like I had, I would say try it. I am sure you would love it. And come back and let me know if you too instantly fell in love with this snack.
Ingredients- 2 ripe plantains/ Ethakka (refer tips)
- 1 1/2 cup of grated coconut
- 1/4 tsp of cardamom powder
- 3-4 tbsp of sugar
- 2 tbsp of ghee
- 1 tbsp of raisins
- 1 tbsp of broken cashews
- Oil for deep frying
Method![]()
- Steam cook the plantains in a steamer, untill they cook well and turn soft. Peel off the skin and remove the middle seed portion of the plantains and grind them in a grinder without adding any water. Keep it aside.
- In a pan, take the ghee and fry the cashews. Once the cashews are half fried, add the raisins and fry them. Now add the sugar and grated coconut to it and stir it untill everything gets evenly distributed and the sugar gets melted. Turn off the heat and let it cool down.
- Now make 1 1/2 inch sized balls out of the ground and cooked banana. Flatten it on your palms and drop in a tablespoon of the coconut mixture in the center of it. Lock the open sides of the flattened banana mixture and shape them as you see in the picture.
- Deep fry them in oil and remove it on to a plate lined with tissue paper to drain away excess oil. Serve it with tea/coffee.
Tips- You would get it right only if you have chosen the plantains correctly. The plantains should be ripe but not overripe. If you gently press them, it should be soft but firm enough to not loose its shape or become hard to work with, once steamed.
- Greasing your palms with ghee while shaping them would avoid sticking.
- There are different versions of this snack. Sometimes you would come across Unnakaya with some egg filling in it. I have never tasted one nor have I tried, yet.
![]()
↧
September 27, 2015, 10:35 pm
My little space turns 3 today! Time flies, I must say. I still remember, 3 years back, one fine day I put across the thought to Jacob, of starting a blog. And his 'Yes' was so strong that it started. But I never thought it would come this far with me (the lazy one being the author of it :) ). And all thanks to all my supporters and my blogger friends who kept the fire in me on, to keep it going.
![]()
![]()
While I was preggy, I tried to eat healthy snacks other than stuff myself with some junk and fried stuff. Every other person I met, used to recommend me, to have oats. I had always hated oatmeal, but I was so determined to try having it. I got a big can of oatmeal (bad idea). But the very first attempt of having it made me sick.
Since then, the oatmeal pack was pushed to a corner of the kitchen cabinet. It then came to light only after Jordan was out. I thought of trying it again. But nope I just didn't like it.
I thought of giving it another form to make sure I don't waste it. And thanks to the recipe on the lid of the oatmeal pack that I got the idea to convert them into cookies. I had never thought of buying another pack of oats untill I ate these cookies. They were super yumm, filling and addictive. If you hate oats I would highly recommend you to try these cookies, they would make you fall in love with oats. This is the recipe to those addictive cookies.
![]()
Ingredients- 1 cup of unsalted butter, softened
- 1 cup of brown sugar
- 1/4 cup of granulated sugar
- 2 large eggs at room temperature
- 1 1/2 tsp of vanilla extract
- 1 tbsp of honey/maple syrup
- 1 1/2 cups of all purpose flour
- 1 tsp of baking soda
- 1 tsp of cinnamon powder
- 1/2 tsp of salt
- 3 cups of old fashioned oats
- 1 cup of raisins
Method![]()
- In a large mixing bowl, beat the butter and sugar untill it turns smooth. Add the eggs, vanilla and honey/maple syrup. Beat it well untill everything gets combined well.
- In another bowl, mix the dry ingredients (7-10). Add it to the wet ingredients little by little untill everything gets combined together. Now add in the oats and raisins and fold in so that everything gets evenly distributed. The dough would be sticky.
- Refrigerate the dough for an hour.
- Preheat the oven to 350 F.
- Roll out balls of dough(about 1 inch in diameter) and place them 2 inches apart on the baking sheets lined with parchment paper. Bake for about 10 minutes untill the sides turn brown in colour. The center portion of the cookie would look uncooked but they would continue to cook as you let these cookies stand for 5 minutes on the baking sheets, before transferring them on to a wire rack.
- Once they cool down, you could transfer them in to an air tight container and store it for about a week and a half.
Tips
- Chilling the dough is an essential step in the preparation of the cookie. Do not skip it.
- You could add walnuts or almonds to the cookie dough if you wish to.
![]()
Recipe courtesy : Adapted from the Quaker oats cookie recipe
↧
↧
October 5, 2015, 10:42 am
We don't indulge in mutton often, but when we do, there is always a push towards making this varutharacha mutton curry. It tastes yumm this way.
This curry may sound to be time consuming, but it's not that big a task and it is all worth it. Last time I made this curry to mellow down the Monday blues that usually hits us by the second half of EVERY Sunday. We paired it with some Kerala/malabar Parotta and it did the trick of bringing in life to the otherwise dull and Monday-blue-attacked-Sunday night.
Next time you get mutton, try this recipe and I am sure it would leave you licking your fingers. They are sooo good.
On another note, I was looking at the stats of my blog and I noticed that Beef Ularthiyathu was one of the popular posts on the blog. And I am not surprised because it is one of the best ways to indulge in Beef. Scoop Whoop seconds my opinion by mentioning my recipe as a must try from the state of Kerala. Another reason, why you should be trying it, if not already :). Now that I have introduced you to two fingerlicking meat recipes, let me move on to the recipe for the Mutton curry for now.
Ingredients- 1/2 kg of Mutton, cut into medium sized pieces
- 1 1/2 cup of onions, sliced
- 2 tsp of ginger garlic paste
- 1 tsp of red chilly powder
- 1/2 tsp of garam masala
- 1 medium sized tomato, cut into small pieces
- 1 strand of curry leaves
- Salt to taste
- 2 tbsp of cooking oil (preferably coconut oil)
For making the coconut mixture
- 1 cup of grated coconut
- 2 inch long cinnamon stick
- 2 cloves
- 1 star anise
- 8 black pepper seeds
- 2-3 red chillies
- 1 tbsp of coriander seeds
- 1 tsp of fennel seeds
- 2-3 shallots
- 1 strands of curry leaves
For tempering/garnishing
- 2 shallots sliced
- 1 strand of curry leaves
- 1 tbsp of coconut oil
![]()
- In a thick bottom pan, take all the ingredients listed under the frying of coconut and place it on medium heat. Fry it untill the colour of the coconut turns dark brown in colour. Stir it continuously. Do not burn it.
- Turn off the heat and let it cool down. Once cool, grind it into a fine paste by adding just little water.
- Meanwhile, clean the mutton pieces.
- In a pressure cooker, take the oil. Once hot add the onion, ginger garlic paste, curry leaves and salt. Saute it untill the onion turn tender. Now add the red chilly powder and garam masala. Give it a mix. Now add the tomatoes. Continue to cook untill the tomatoes cook and disappear. Add the mutton pieces to it and about 1 cup of water. Give it a mix and cover and pressure cook it until the mutton pieces are cooked. For me it took, 1 whistle on high heat and 3 whistle on medium heat.
- Once the pressure subsides, open the pressure cooker and turn on the heat. Add the ground coconut mixture to it and let it all come to a boil. Turn down the heat to low and let it cook for another 5 minutes or so. Adjust the gravy as per your need.
- Remove it on to a serving dish.
- For garnishing, take the oil in a pan. Once hot, add the shallots and curry leaves. Fry it and spread it on top of the mutton curry. Serve it with chapathi / Kerala Parotta / Rice.
Tips- The gravy thickens while it sits, so you may want to adjust the gravy accordingly.
![]()
↧
October 14, 2015, 1:52 am
I am one happy soul, if I get to have something to bite on during tea time with the coffee/tea. If it is homemade then my happiness doubles. During my hostel days, when we would return from college in the evening, it would be time for tea. We would pass by the mess, to peek in and see what would be served as snack with tea. If its Puffs, Banana fritters/Ethakka Boli, Ulli bhajji / Onion fritters etc. we would rush to our room to grab our coffee mug and get back to the mess to have them. If it was plain bun, tiger biscuit etc., which were usually served on friday's then we wouldn't even bother coming down for coffee once we get to our own room, as if it was not worth the effort climbing up and down the stairs to grab it.![]()
My mom used to make something to munch on for snacks so that we could have it during tea time. I remember having these as snacks after we got back home from our play time. And I would then sit in front of the TV to watch Small Wonders (a TV show) while I enjoyed the snack. Luckily I had some banana leaf handy, when I thought about it and I could make them to go with tea. It just melted in my mouth. I then realized, I had to crave this simple ada real bad so that I could appreciate this snack more than how I did, while I was a kid. If you manage to get some banana leaf, this is a must try. You would love it.
Ingredients- 1 1/2 cup of finely ground rice flour - lightly roasted/heated
- 1/2 tbsp of ghee or butter
- 1/4 tsp of cardamom powder
- 1 cup of shaved jaggery
- 3/4 cup of shredded coconut
- 1 cup of hot boiling water
- Salt to taste
- Banana leaves, cut into rectangles
Method
![]()
- In a pan, melt the jaggery with little water. Once it melts, strain it to remove impurities, if any. While it is still hot, add the shredded coconut to it. Mix it well.
- In another pan, heat the ghee. Once hot, add the jaggery and coconut mixture to it and mix it thoroughly. Let any extra water content dry up. Add the cardamom powder and give it a mix. Remove it from the heat and let it cool.
- Meanwhile, in a bowl take the rice flour and add salt to it. Mix it well for the salt to spread evenly. Now add the boiling water little by little to the flour while you mix it with a spoon to form a dough. Cover and keep it aside to cool down just a little (about 5 minutes) and is ready to knead with your hands. Knead it to form a smooth and non sticky dough.
- Divide the dough into equal portions and roll it into balls. Take each ball and place it on a banana leaf. Gently flatten it by pressing on to the banana leaf. Now start working with your fingers(holding together) and spreading the dough evenly on the banana leaf. Drop 1-2 tbsp of coconut jaggery mixture on it and spread it. Fold the entire spread into half just once and press it gently so that they stick together.
- Prepare the steamer/pressure cooker to steam cook it. Steam them for about 10-12 minutes. Let it cool down a little. Serve it warm.
Tips
- Do not pour the boiling water to the flour at one go. It would get difficult to work with and may result in a sticky dough.
- Wetting your hands, just a little, would help working with the rice dough. It wouldn't stick on to your hands and would help spread the dough with ease.
- I used a light coloured jaggery. You could use a dark coloured jaggery for it and they would look and taste better.
- Using fresh coconut would be even more better than the store bought ones. It would make the stuffing more juicier and would taste good. Feel free to add in more coconut as per your desire. More the coconut, more heavenly its gonna taste.
![]()
↧
October 16, 2015, 10:36 am
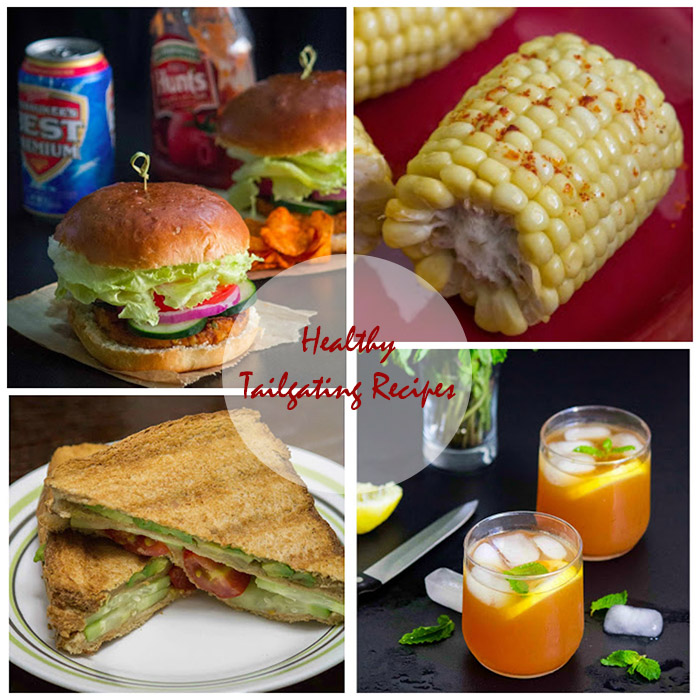
It's the football season, which calls for tailgating parties. The fun just gets doubled when watching the game is paired with food. And if the food is healthy; that won't pack on the pounds, its an instant hit. So this post is all dedicated to healthy tailgating tips/ recipes. Hope I would be able to inspire you with my snack-spiration :).
Tailgating is incomplete without a Burger or hotdogs. When the layer of patty gets interestingly different in taste, ingredients and health wise; it has to get a thumbs up. This Burger with fish Patty would make an amazing item for tailgating. And ya, it wouldn't let you go too full unlike cheese burgers, that you can't enjoy other items on the menu. Another option could be to go with Stuffed buns (with Chicken filling) . They lack the greens, unlike Burgers, but they are less messy to be served as well as to have. The Corn on the cob could pair well with the burger. Slightly sweet and juicy yet has the spiciness of paprika and sourness of lemon - This simple corn on the cob is a blend of possibly many flavors that one could ask for. You could also scoop out the corn and serve them in the glass with spoon.
![]()
Now, coming to the drinks. You would need to consider something other than just beer to serve as a drink. And serving this Iced Lemon Tea is such a healthier alternative to coke. So refreshing. It could also pair well with this Pizza and the Baked chicken thighs, another options you could give a shot.
If you want to go very low with the calorie intake, then this Grilled Vegetable Sandwich cannot be skipped. It would be so quick to put together and ready in a blink of an eye, that it has to be the tailgating topper. Grilled sausages in hotdogs are usually the ones that are mostly looked forward to, during tailgating. What if, deroute and take a different way of serving sausages by serving these cute pigs in a blanket. They would be a perfect snack item for this season.
Not happy with any of the options? You may consider serving Meat balls Asian style. We had an amazing tailgating party a couple of years back and serving these meat balls was a right choice as it was a big hit. Wondering what could go as a light and balancing side for these heavy meat bells? Amazingly crisp and refreshing bite on these Lettuce wrap would serve the purpose. You got to try it.
Snacking on a little bit of cookie/muffin is okay untill you stay within limits and choose for healthiest amongst them. These Chocolate dipped strawberries, Blueberry Muffins and Oatmeal Raisin cookies are some amazingly healthier options for your sweet tooth.
Hope this list comes to use while you tailgate this football season and have an amazing time with friends and family.
I would wanna thank Nuts.com for inspiring me to do a post on possible healthy tailgating recipes this football season. Don't forget to visit their website which has lot more healthy snacking options.
↧
↧
October 21, 2015, 10:47 pm
I don't think there is anyone, who can predict the number of Idlis/Chapati/Appam/Pancake or anything that would be just sufficient for the family. Atleast, I can't. I go by the thought that it is better to make a little extra rather than going by a fixed number to just suffice the need. In short, I am scared to let anyone stay hungry. Result, I end up having leftovers, which I hate.
Leftovers are very difficult to feed my Janta. So I try to turn them into something else so that my crowd is happy having it and I am happy to have used up the leftover :).
Idli Upma is something that we usually end up making with the leftover idlis. Jordan loves it. If he catches us having it, then he would attack us and keep saying, "Thanne Thanne" meaning "Give it to me". We are trying to correct it to Tharamo meaning Can you give it to me? But still, we are so much relieved that now the number of meaningless cries to get something while we break out heads to understand what he wants, is going to reduce once he starts to communicate. Ahh, he is a big boy now. I donno if I am happy or sad about it. Anyways, coming back to Idli Upma, try it for your kids and family as tea time snack or breakfast. These are amazing.
![]()
Ingredients- 6 idlis - cut into four
- 1 tbsp of oil
- 1/2 tsp of mustard seeds
- 2 tbsp of finely chopped onions
- 1 tsp of finely chopped ginger
- 1 strand of curry leaves
- 1 green chilly, chopped
- 1/4 tsp of turmeric powder
- A pinch of asafoetida
- 1-2 tbsp of chopped coriander leaves
- Salt to taste
- 2 tbsp of water
Method![]()
- In a pan, heat the oil. Once hot, add the mustard seeds and let it splitter. Now add the chopped onion, ginger, curry leaves and salt. Stir it untill the onions turn tender.
- Add the turmeric powder and asafoetida. Stir it. Add 2 tbsp of water to it. Now drop in the idli pieces. Mix it well so that the masala mixture coats each idli piece. Cover it and cook for about a minute or two. Switch of the heat.
- Sprinkle the chopped coriander leaves over it. Serve it hot.
Tips- If you love cumin/jeera, you could add jeera while the mustard seeds pop. It would add flavour to it.
- A tbsp of water is added to dilute the masala mixture, so that it would be easy to coat the idli pieces with it. Do not add too much water else the idli would get soggy.
![]()
↧
October 25, 2015, 5:46 am
↧
October 30, 2015, 10:16 am
Spinach has always been my favorite. Well, it is such a nutritious leafy vegetable, so what is wrong in falling in love with it. I usually store it in the freezer having cleaned, chopped and sealed in a ziploc bag. So that I can use it to make this stir fry without wasting too much time.
Whenever, we get back from a trip longing to eat homely food, I usually end up making this stir fry. It is so hassle free having those stocked up spinach handy and can be prepared in just minutes.
This stir fry is our family favorite. Try it if you have not already had these and you too would love it.
Ingredients- 2 bunches of spinach, chopped
- 4 tbsp of finely chopped onions
- 1 green chilly, slit
- 1/4 tsp of turmeric powder
- 2 tbsp of oil
- 2 large eggs, beaten
- Salt to taste
Method- In a skillet, add the oil. Once hot, add the turmeric powder, chopped onions and green chilly. Sprinkle some salt and saute it till the onion turns tender.
- Now add the chopped spinach to it. Cover it and let it cook.
- Once it is half cooked, add the eggs and mix it. Keep stirring it occasionally so that the eggs don't stick to the bottom of the skillet.
- Remove it from the heat once the egg is cooked completely.
- Serve it with rice or chapathi.
Tips- Spinach releases water once it starts cooking. If you find too much water while the spinach is cooking, let it get evaporated before you add in the eggs.
↧
November 5, 2015, 2:17 am
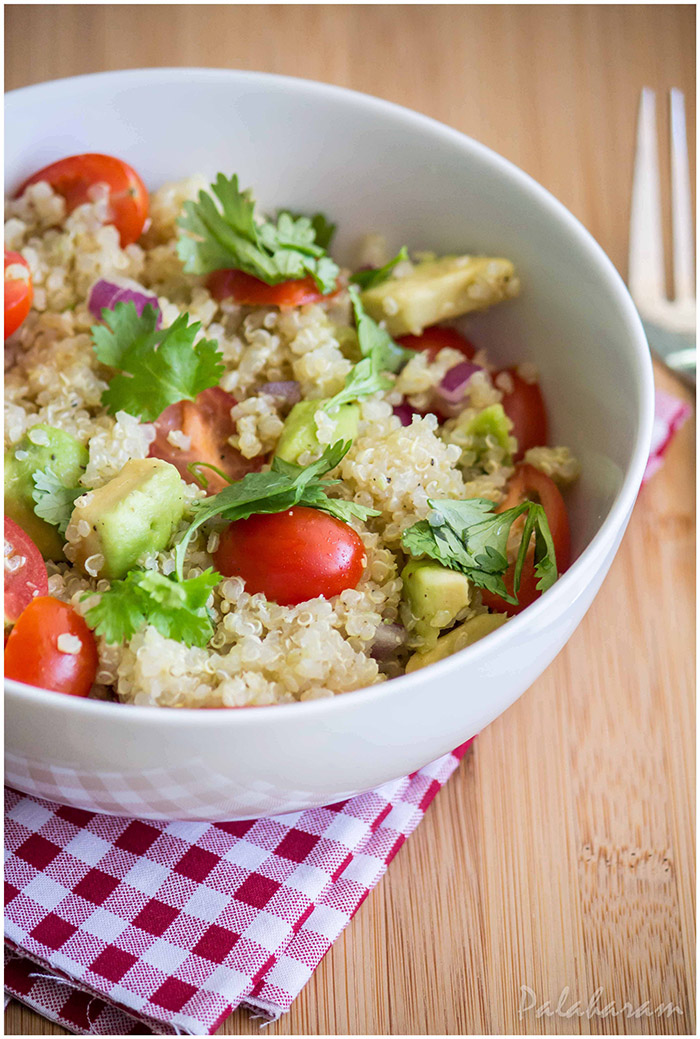
Salads are so refreshing. If they include something more than just the greens, then it gets filling to. This Quinoa Salad is such a hit at our home. We first tried it as a tea time snack to get approval (we were just not sure if we would be ready to stand the trial version when hunger is at peak level i.e. during lunch or dinner). And it definitely was a success. Jacob even approved it to be packed in the lunch box for office. Else salad is always the last option that he would pick.
Usually we have the Nadan lunch at home. Rice with a vegetable side, either thoran or mezhukupuratti , a curry to pour over the rice and a non - veg curry. But there are days when I would need a change from the daily stuff and have chapati and curry, salad etc. This recipe comes handy then. I feel so good having this salad cause of the thought of it being healthy.
Try it and let me know if you and your family loved it. I love it and so does my family :).
![]()
![]()
Ingredients- 1/2 cup of quinoa
- 1 cup of water to cook the quinoa
- 1 cup of Avacado , diced
- 1 cup of grape tomatoes, slit into half
- 2 tbsp of cilantro leaves, chopped
- 1 tbsp of oilve oil
- 1 tsp of lime juice
- Salt to taste
- Pepper to taste
Method![]()
Cooking of quinoa
- Wash/ rinse the quinoa with water. In a heavy bottom pan, take the rinsed quinoa, salt and water, to cook the quinoa. Bring it to a boil and then cover and simmer the heat to medium. Let it cook for another 12-15 minutes untill the grains become translucent.
- Remove it from the heat and let it stand for another 5 minutes. Open the pan and fluff it with a fork. Let it cool down before you combine with the other ingredients of the salad.
Preparation of Quinoa Salad
- For the Salad dressing, take the olive oil. Add lime juice to it and mix it well. Now add salt and pepper and give it a stir.
- Add the avacado, tomatoes and cilantro leaves to the cooked quinoa and pour the salad dressing on it. Give it a mix so that all the ingredients get evenly spread.
Tips- Do make sure that you wash/rinse the quinoa well. Else it might taste bitter.
- You could add cucumber, cooked black beans and boiled corn to the salad.
- You could make it fruity too. Just add some clementines/cuties, dried raspberries, pineapple etc. with a little bit of ranch as the dressing.
![]()
↧
↧
November 12, 2015, 9:10 am
Belated Diwali wishes. I love diwali season because of the enthusiasm filled in everyone to decorate their houses with lights. Even the shops are decorated with lights - different types and in different colours. They look amazing. Every weekend and sometimes on weekdays too, we have a walk outside. The streets are pretty busy irrespective of whichever day we choose to go out for the walk. The chaat walas, balloon vendors, vegetable vendors etc. make sure that the street is always lively. My main attraction amongst them is the Halwai/ sweet shop vendors. It would be very unusual if we don't stop by the sweet shops. They even know how to make sure that we stop by, even if we were not intending to.
![]()
![]()
The other day, we were double minded if we should get some sweets, since we were feeling guilty of having them on a regular basis. And by the time we passed by the sweet shop, the vendor called out, Jalebi garmagaram , meaning Hot Jalebis. Oh god, this is called temptation. We were trying to control ourselves and there we let go our control over those two words that guy called out and fell for it.
I am sure you too would have gone sugar high having different sweets, this Diwali season. I just can't say no to them. Infact, if we at a buffet, my main attraction would be the dessert bar. I can proudly say that Jacob is also slowly joining the gang and developing a sweet tooth.
Today's recipe is Rasgulla. Should I say more about this highly addictive, sweet and juicy milk fudge balls. Infact, I should just stop explaining about it to prevent any scene of saliva dripping down while I speak ... he he...
Happy Diwali everyone. Have a safe one. And do not forget to try these Rasgullas at home. Because nothing beats the taste and happiness of having homemade sweets.![]()
![]()
Ingredients- 1 litre full fat milk
- 1 1/2 tbsp of lemon juice/vinegar
- 3 1/2 cups of water
- 2 cups of sugar
- Cold water as required
- 1/4 tsp of cardamom powder
- Nuts for garnishing
Method![]()
- In a pan, heat the milk. Once it begins to boil, add the lemon juice/ vinegar. Simmer the heat and stir it untill the whey separates completely.
- Strain out the chenna on to a muslin cloth placed on a strainer. Rinse the chenna with cold water. It would prevent further cooking of chenna and also make it moist so that they don't dry off but remain soft.
- Tie the chenna in the muslin cloth. Press out excess water from it. Let it hang for about half an hour to remove the water from the chenna.
- Now remove the chenna from the muslin cloth and knead it well for about 5-10 minutes. The earlier crumbled chenna would now come together into one smooth and soft ball. Pinch out small portions of chenna and roll it out into small balls. The balls would get doubled in size once cooked. So you would want to roll out the balls in half the size of the rasgullas that you are looking forward to making.
- Once you have made the balls, take the sugar and water in a pan, wide enough for all the rasgullas to float. Heat it untill the sugar dissolves and starts boiling. Add the cardamom powder and give it a stir. Add the balls to it and cook it on full heat for about a couple of minutes. Simmer down the heat and let it cook. Ensure to lift the lid and release the water vapour every now and then. Cook it untill the rasgullas double in size, which may take about 10-15 minutes.
- Check the syrup for sweetness. If you want it more sweet and thick, remove the rasgullas on to a bowl of normal water. Keep the pan open and let the syrup boil for some more time, while you stir it now and then, untill it is a little thick and more sweet. Add back the rasgullas, to the syrup, having squeezed out the water from it.
- Let the rasgullas cool down completely. Place them in the refrigerator to chill. Garnish it with chopped nuts and saffron. Serve it chilled.
Tips- You could cook the rasgullas in pressure cooker too. For that, after adding in the rasgullas, to the sugar syrup, place the lid and weight. Let it whistle once on high heat. Switch off the heat and wait for the pressure to release. Remove the lid. Rasgullas should have doubled in size by now. Check the syrup for the consistency and sweetness. If you think the rasgullas need to be cooked a bit more and the syrup needs to be a bit more thicker and sweeter, then cook it for few minutes. However, do not thicken the syrup too much. Eyeball it to attain the right consistency.
- Do not over cook the rasgullas, else they would loose its shape.
![]()
↧
November 20, 2015, 12:26 am
At my home, we have never bought Banana flower from the market. We had banana trees planted and every time it flourishes, every part of it would take the shape of a dish. Few bananas would be kept apart to ripen, while others go into making of chips, stir frys , kalan etc. There were dishes made out of the raw banana peel and also the banana stem. Oh and how can I forget the extracting of honey from underneath the banana flower petals. I used to love it. In short, maximum utilization of having a banana tree at home.
However, now when I buy banana flower from market, I always think how good were those days when we used to have those organic food from our own vegetable garden. My mom laughed at me when I proudly told her that we got hold of some banana leaf(torn and sad looking) and bought it to make Meen pollichathu.
But whenever, we find these banana flower at the store, we grab these and make it. Both of us love having it, even though I hate cleaning it. My mom does something with her fingers to grab/remove sticky threads out of the edible portion. I haven't learnt that technic yet but I am trying to. If you forget about the effort required in cleaning it, this stir fry is one healthy and tasty dish that you can prepare as a side for rice. Here is how we make it. Hope you like it.
![]()
![]()
Ingredients- 1 large Banana flower
- 1/2 cup of moong dal
- 3-4 shallots finely sliced
- 2-3 green chillies, slit
- 1/2 cup of grated coconut
- 1/4 tsp +1/4 tsp of turmeric powder
- 2-3 tbsp of coconut oil
- 1 strand of curry leaves
- Salt to taste
Method![]()
Cleaning of banana flower- Apply oil on both your hands or wear gloves to prevent your hands from turning dark while you handle the banana flower.
- Start removing the petals one by one. Under each petal you would have a bunch of florets. Collect it in a bowl. Keep peeling off the petals untill you reach the white portion. This white portion is the edible portion.
- Take a bowl with water and add salt to it. Chop the white portion of the banana flower into small cubes and drop them into the bowl of water.
- Now clean the florets that you have collected in the bowl. Remove the black stamen and a cup shaped portion of each of the florets, as they are not edible. Chop the remaining edible portion and drop it in the bowl of water.
- Once chopping is done, rinse them couple of times in water. Drain off excess water and remove it on to a plate. Pour a tbsp of oil and give it a mix, so that they do not turn black.
Cooking of Banana Flower- Pressure cook the moong dal with enough water. For me it took only 1 whistle. However it would depend upon the variety of the moong dal you are using. Moong dal should be cooked just enough so that they are easy to bite through however, should not get overcooked that they loose its shape. Drain off excess water and keep it aside.
- In a skillet, heat the oil. Once hot, add the sliced shallots , curry leaves and green chillies. Saute it untill they loose its rawness. Add 1/4 tsp of turmeric powder and give it a stir. Now add the cut banana flower to it and add salt as required. Give it a mix. Sprinkle little water if you think it is too dry.
- Cover and let it cook untill the banana flower is half cooked, while you stir it occassionally to prevent it from sticking to the bottom of the skillet.
- Meanwhile, in a bowl, take the grated coconut and 1/4 tsp of turmeric powder. With your finger tips mix it well.
- Add the cooked moong dal and grated coconut to the banana flower in the skillet. Give it a mix.
- Let it cook for another 5 minutes.
- Remove it from the heat and serve it with rice.
Tips- Do not over cook the banana flower, else they tend to turn dark.
- Do not delay in preparing the stir fry after you have cleaned the banana flower. The longer you let them stay open, the darker the banana flower turns into.
- Do not over cook moong dal else, when added to the stir fry would turn all mushy.
![]()
↧
November 25, 2015, 1:47 am
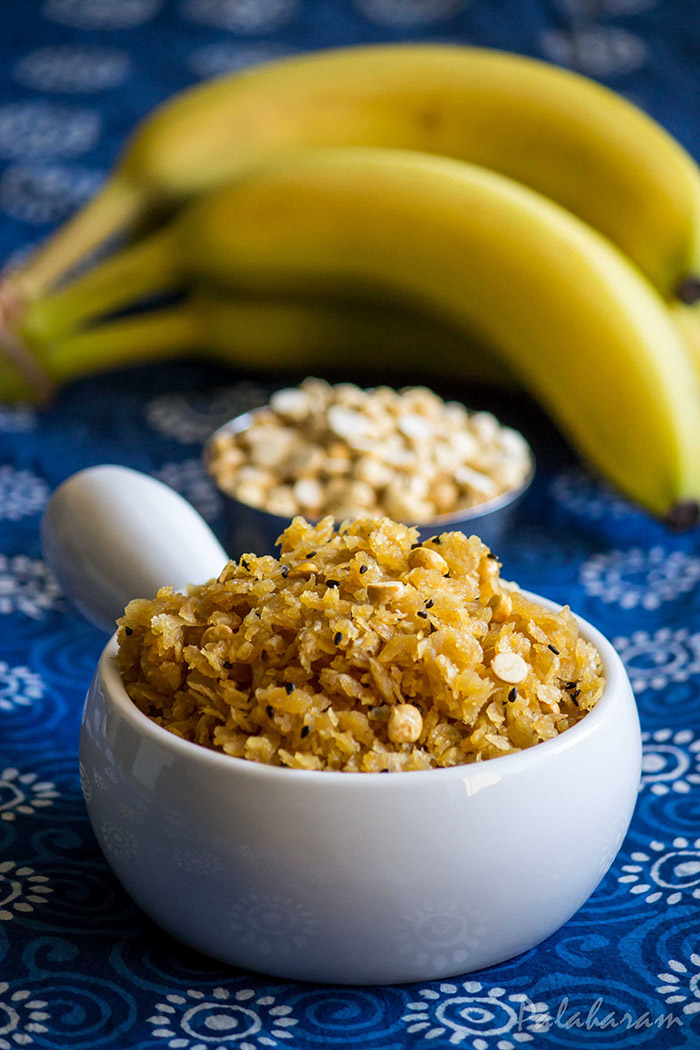
Aval vilayichathu is one among my favorites. My grandmother used to make these for us to take with us while we travelled back after our vacation, so that we could have it in train. She used to make it with lots and lots of coconut in it. We used to love having it. The very thought of it is so nostalgic and mouthwatering. My aval vilayichathu would come nowhere close to hers.
Jacob doesn't like it, so this was made exclusively for me. I being a fan, thoroughly enjoyed it. I have always been a fan of it. There is another uncooked version called aval nanachathu, that I am fan of. While in hostel, we used to get it for evening snack and not many of us used to like it. However, I used to be a happy soul when it was served. And people who didn't like it used to donate their share. So I sometimes used to end up having some portion of the donated ones too :P. Here is how I make it.
![]()
Ingredients- 2 cups of Aval/ Beaten rice flakes / Poha
- 1 1/2 cup of shaved Jaggery
- Water as required
- 1 1/2 cup of grated coconut
- 1/2 tsp of cardamom powder
- 1/4 tsp of Chukku or dry ginger powder
- 1 tsp of Black sesame seeds
- 2 tbsp of Chana dal/ chick pea
- 2 tsp of ghee/ clarified butter
Method![]()
- In a thick bottom skillet, add the jaggery and 1/2 cup of water and melt it . Once it melts, check its consistency. It should be one thread consistency i.e. if you take a drop of melted jaggery on your pointing finger and using your thumb touch it and pull apart gently, it should stretch in a single thread without breaking up. Be careful to not burn your fingers while you do it as the melted jaggery would be hot. Now strain the melted jaggery to ensure it is free of impurities.
- Reheat the strained melted jaggery. Turn the heat to low. Add the grated coconut, cardamom powder and dry ginger powder. Mix it thoroughly so that the jaggery coats the coconut well. Add the rice flakes to it and stir it again well, so that the rice flakes get coated well with the jaggery coconut mixture. Let it cook for about 5-10 minutes while you keep stirring the mixture to ensure everything gets mixed well. By now, the extra water content would have been absorbed and the rice flakes would be soaked well in jaggery. Remove it from the heat.
- In another skillet, heat up the ghee and roast the chana dal and sesame seeds in it. Spread it on top of the rice flake mixture and toss it well to spread it evenly.
- Let it cool and serve it with banana.
- You could store it in an airtight container for a week or two. It is good option for tea time snack as well as for breakfast.
Tips
- Use the darker version of jaggery to get a darker colour for the aval vilayichathu.
- You could use white/red rice flakes to make it. I used white rice flakes in this recipe.
- Try using freshly grated coconut which makes it more juicier and tasty. Also adding more amount of coconut would enhance the taste.
- You could also roast some peanut in ghee and add to it, if you wish to.
![]()
↧
December 7, 2015, 9:37 am
I wouldn't mind having dry curries/ sabzi with chapattis. But Jacob is a gravy man. So in the initial days of married life, I accidentally tried this curry and it was a hit. So my list of gravy curry got longer by one more and I named it vegetable kurma :).
This is super easy to make while you are hurrying to make breakfast on a working day, at the same time preparing food to pack up for lunch too.
Try making it and I am sure you too would like it.
![]()
Ingredients- 1 cup of red onion, finely sliced
- 2 green chillies, slit
- 1/2 tsp of turmeric powder
- 1 1/2 cup of carrots, cut into long thin pieces
- 1 1/2 cups of green beans, cut into long pieces and split into halves
- 1 1/2 cups of potatoes, cut into long thin pieces
- 1 strand of curry leaves
- 1 tsp of garam masala
- 3-4 tbsp of yogurt
- 1 tbsp of chopped coriander leaves
- 1 cup of water
- 3 tbsp of cooking oil
- Salt to taste
Method
- In a pressure cooker, pour in the oil. Once hot, add the sliced onions, green chilly, curry leaves and salt. Saute it till the onions turn tender. Add the turmeric powder to it and give it a mix.
- Now add the potatoes, carrots and beans. Give it a mix. Let it cook for a minute. Pour in the water and let it come to a boil.
- Close the pressure cooker and cook it on high heat for 2 whistles. Remove it from the heat and let the pressure release.
- Open the pressure cooker, adjust the salt and water as required for the gravy. Add the garam masala and bring it to a boil. Remove it from the heat and let it cool down a bit.
- Now slowly add in the yogurt to it and give it a mix.
- Garnish it with coriander leaves and serve it with chapattis.
Tips
- Do not add yogurt to the curry when it is too hot, else the yogurt would curdle.
- This curry isn't spicy and so you could add in more green chillies if you wish to make it a bit more spicy.
- Do not overcook the vegetables else they would turn mushy. The curry would look and taste good only if the vegetables remain in the form that you could bit into them.
↧
↧
December 14, 2015, 10:24 am
X'mas is fast approaching. I guess you would have long back started off the preparation by soaking the dry fruits for the Fruit cake and also fermenting the grapes for the awesome homemade grape wine, to pair with the cake. If you have not done it yet, then I am sorry I really can't help you make a homemade grape wine because it would need those number of days to age, to achieve a perfect grape wine. But if you have not soaked up the fruits yet, then may be I could be of some help. The Fruit cake recipe that wouldn't require your fruits to be soaked for days is here.
![]()
![]()
![]()
![]()
On a separate note, my Meen Pollichathu recipe grabbed a second prize in the 'Regional Recipes of India contest' hosted by Betterbutter! I am shocked for myself (Its unusual that I turn lucky at contests), at the same time Not at all surprised for the recipe which got selected. This Meen Pollichathu recipe is such a perfect one. It's our favorite as well as one among the most popular recipes on the blog. You should try it too, if not already. May be include it in your Christmas/New year special menu. What say ?
Ingredients- 1/2 cup sugar
- 1/4 cup of warm water
- In a thick bottom pan, take the sugar.
- Continue stirring it while heating it. Sugar would start melting and would turn brown in colour.
- Remove it from fire and pour the warm water slowly.
- Place it on fire, again and bring it to a boil, while stirring.
- Cool it and store it in an air tight container in the fridge and use it when needed for pudding, fruit cake etc.
Tips- Use a long handle spoon, to stir the sugar/caramel, as there are chances of burns caused while the sugar is boiling.
- While pouring in the water to the sugar, be careful as the water might splash and cause burns.
- The longer you heat it, the darker it gets. In the picture, the syrup doesn't look that dark as it originally was, because of the background light. But it looked pretty, doesn't it :)
↧
December 23, 2015, 1:55 am
Curd lovers, we are. Both me and Jacob hate milk. Infact, we are kind of allergic to it. So the milk intake is substitutes in the form of curd, buttermilk etc. Guess what, our lil Jordan is following the same path.
Raita is another form in which we love curd. It is a must to go with Aloo paratha or fried rice etc. Growing up, I have usually had cucumber or onion raita. But pomegranate raita was kind of new to me. The first time we had it, it was instant hit. Every bite on the pomegranate seeds combined with the yogurt was so refreshing. It has the blend of tastes- sweetness of pomegranate, sourness of yogurt, salty and spiciness of the chillies. Ever since, we have been frequently making it to pair it with some main dish or to eat it plain.
Here is what goes into making it.
Ingredients![]()
- 1/2 cup of pomegranate seeds
- 1 cup of yogurt
- 1 tsp of chopped coriander leaves
- 1/2 tsp of chopped green chillies
- 1/4 tsp of roasted cumin powder
- 2-3 mint leaves chopped or crushed
- Salt to taste
Method
- In a bowl add all the ingredients except pomegranate seeds and mix it all well to evenly distribute the ingredients.
- Now add the pomegranate seeds and give it a stir.
- Serve it with fried rice, roti or have it as it is. They just taste amazing.
Tips
- You could alternate the green chillies with red chilly powder, to avoid bitting into the green chillies.
- You could omit the use of mint in it if you don't prefer its taste.
↧
December 26, 2015, 2:03 am
↧
December 29, 2015, 1:23 am
Having something for tea time snack is just so fulfilling. It's not a must in our family though. Just tea or milk with some biscuits or fruits would serve the purpose. But I love to see the happy faces when served with some home made snacks. All the more I come from a family where my mom used to make an effort to serve us something hot and homemade to munch on snack with our milk. I used to love it and I try to continue the same.
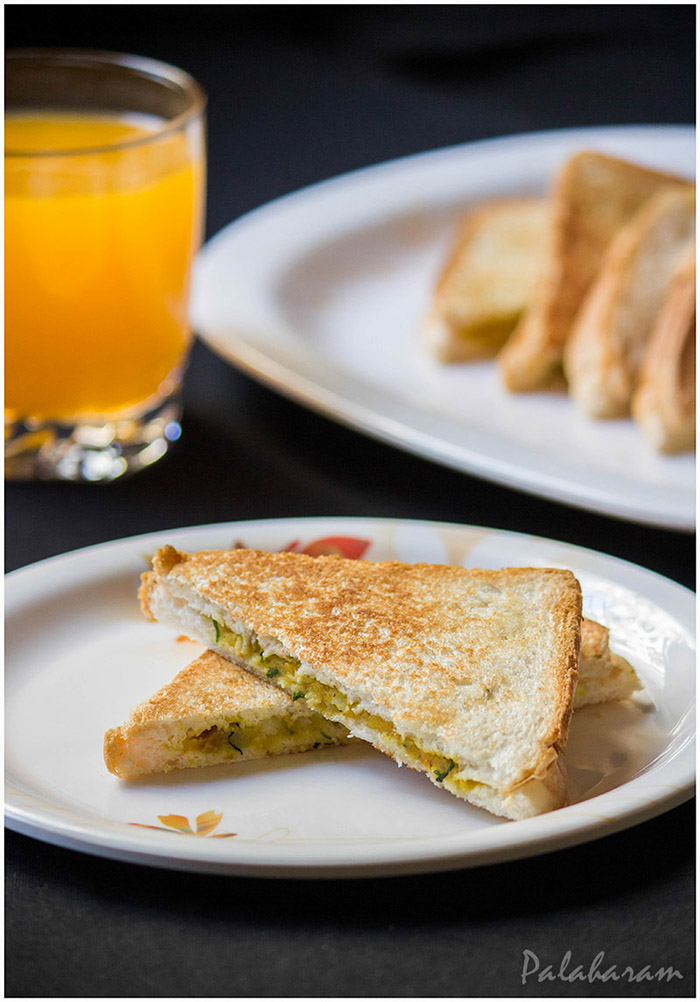
Now the other day, my intension was to make a fried paneer pocket. But then I had a packet of bread bought the previous day which I had to use up before it goes dry and bad. So I ended up making these and named them paneer pockets because they look like them, don't they.
Both the J's liked it. I didn't have to feed Jordan or beg him to eat it. e liked it and fed himself 😊. I was happy too that instead of deep frying the pockets, I got this done easily and as a healthy version.
Ingredients
For the paneer bhurji
- 1 cup of fresh paneer, crumbled
- 1 small tomato, cut into small cubes
- 1 tbsp of finely chopped onions
- 1 tsp of ginger
- 1 tsp of finely chopped coriander leaves
- 1/2 tsp of red chilly powder
- 1/2 tsp of cumin seeds
- 1/4 tsp of turmeric powder
- 1/2 tsp of garam masala
- A pinch of asafoetida
- 1 tbsp of cooking oil
- Salt to taste
For the pockets
- 7 slices of bread
- Butter as required
Method
For the paneer bhurji
![]()
- In a pan, heat oil. Once hot add the cumin seeds and let it splutter. Now add the onions and ginger. Saute it until the raw smell goes off and the onions turn tender.
- Now add the red chilly powder, asafoetida, turmeric powder and garam masala. Give it all a mix. Add the tomatoes and salt and let it cook until the tomatoes cook.
- Now add the crumbled paneer and coriander leaves and stir it. Let it cook for another minute. If the mixture seems to be watery , let the water evaporate before switching off the heat.
For the paneer pockets
- Take a slice of bread and chop of the hard sides.
- Now using a roller pin, flatten the bread.
- Place a tbsp of paneer bhurji filling on one side of the rolled out bread. Fold one side of the bread to overlap on the other side. Seal it using water and pressing it down using a fork. Keep it aside in a covered container. Prepare the rest of the paneer pockets before pan frying them.
- Apply some butter on both sides of the paneer pockets.
- Heat a pan. Once hot turn it down to medium heat. Place the paneer pockets on it and grill it until they get nice brown crusted surface. Flip and cook the other side.
- Serve it hot with some tomato sauce.
Tips
- You could use tomato purée or sauce instead of adding the tomatoes. We love bitting on the tomatoes, and hence added the tomatoes rather than the sauce.
![]()
↧
↧
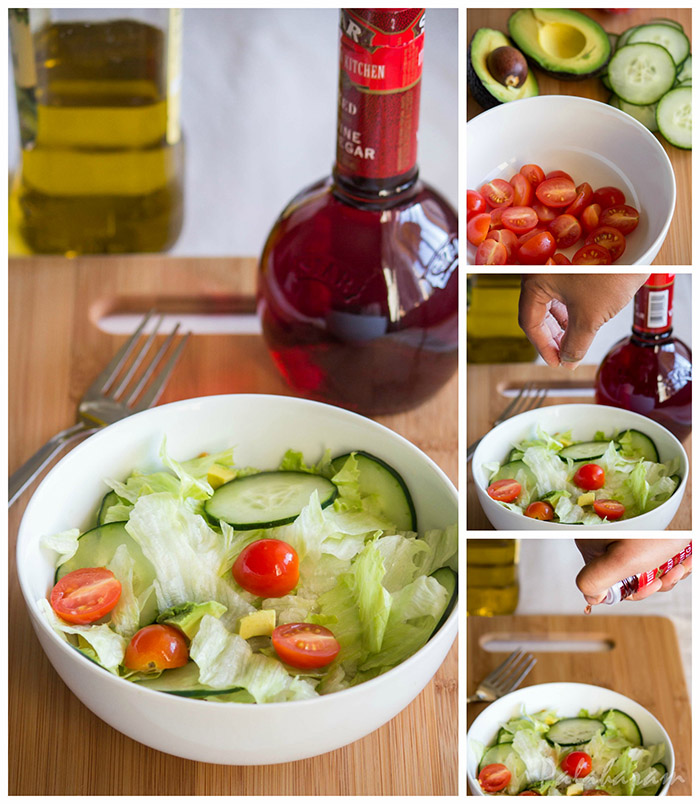
January 5, 2016, 12:45 am
When my cousins visited us, I made Kerala special lunch for them. Having seen the dishes that could stuff someone up with huge calories, they asked surprisingly if that was what we usually have everyday. Well, we may not have that many number of dishes on a single day, but it is what we usually have on our menu.
Now that they were on diet and having inspired by their routine and how it has been helping them cut down unwanted/extra pounds, we thought we could also go by that rule - eat healthy, stay healthy. We too switched to salads instead of fried snacks for tea.
I always used to think how could one eat something raw. Isn't it meant for animals? But once we started having it we knew we were missing out on something all this long. Also, we avoid dressings which actually negates the whole purpose of having salads but supplementing it with red wine vinegar helps.
Ingredients![]()
- 10-12 Grape tomatoes, cut into half
- 1 Avacado , cut into cubes
- 2 cups of Lettuce, cut into strips
- 1 Cucumber, sliced
- Salt and pepper as required
- 1/2 tbsp of Red wine vinegar
Method
- In a salad bowl, add the ingredients 1- 4.
- Sprinkle salt and pepper as per taste.
- Pour in the red wine vinegar and toss it well with a salad spoon.
Tips- You could grate some cheese on top of it to make it more delicious. However, they would add on to calories.
- Add more greens in it like baby spinach leaves, pomegranate seeds, mandarine, pears, boiled egg(cut into cubes), cooked chicken breast , dry fruits (dried cranberries, raisins or almonds)etc. to bring in more variety.
- Pour in little olive oil instead of red wine vinegar and it would make the salad even more delicious.
↧
January 10, 2016, 2:32 am
Kerala Parotta is a must to order while at a Kerala restaurant. Both of us love it. But while in US, we never got a chance to have it at any of the Indian restaurants. Its just the frozen ones that we used to get at the Indian store that we heat up and have. Thus, we thought of giving it a try at home. And guess what it came out so good.
Layered, fluffy and soft Kerala parotta made for a yummy lunch. We literally went back to those old days when we used to visit the restaurant and without giving any second thought or even drifting through the menu would blindly order it. We have tried making it couple of times, but this recipe was the best out of all.
Ahh, there are so many dishes that we miss out on when not being at your home town. To make some of them, we don't even get the raw materials for it. So the story is different. You just end up craving and there is no end to it unless you make a visit to India or home town. But Kerala Parotta can be easily made at home. Just get a bit lenient while you use oil and I bet you can't get wrong here. Try it and give an end to your craving if you too are a Parotta lover like us :).
![]()
Ingredients- 3 cups of all purpose flour
- 1 egg
- 1/4 cup of vegetable oil
- 1 tsp of baking powder
- 1 1/4 tsp of salt
- Water as required
Method![]()
![]()
- In a large bowl, mix all the ingredients together to form the dough. Knead for a couple of minutes untill you get a soft and non sticky dough. Cling wrap it and let it rest for about 3 hrs.
- After 3 hrs, divide them into 8 equal size balls of dough.
- Take a ball of dough. Oil the counter top and start rolling out the dough untill it is paper thin in thickness. It would look like a very thin translucent membrane.
- Starting on one end, make very thin pleats as you layer them up. You would end up with a long string of layered dough. Now start rolling from one end of the dough untill you reach the other end and secure it in the middle of the rolled dough. Keep it aside. Repeat the same with the rest of the balls of dough.
- After you are done making the layered balls of dough, roll out each of them into 6 inch discs.
- Heat up a pan and spread a tsp of oil. Cook the parotta in it, flipping it as needed untill the parotta get brown patches and cooked thoroughly. Once cooked, remove it from the pan.
- Once you are done making 3-4 parottas, stack them and using your palm bash them up quickly, a couple of times, from the sides to separate the layers.
- Serve it hot with any curry of your choice. Some of our favorites are Beef ularthiyathu, Egg curry, Chicken curry, Green Peas curry, Mutton Curry, Mutton Stew.
Tips- I have tried making Parotta a couple of times, and all the time it lacked softness and was dry. The reason being me trying to cut down oil that was supposed to go into it. So please be generous with the oil that you use while rolling out the dough. Infact, I feel I myself should have been a bit more generous while oiling it.
- If you have too many Parottas to make or there is delay in cooking the Parottas after you have formed the layered ball of dough, then cover it with a kitchen towel to avoid drying out.
↧
January 18, 2016, 2:14 am
The most filling, easy and made with regular ingredients is what I could associate potato sandwich with. Pack it for tiffin for school, serve it for breakfast or for tea time snack, include it in Party or picnic menu - they never loose their charm. It's always a hit.
Served with some tomato chilly sauce they are perfect to tickle the taste bites. Here is how I make it.
Ingredients
For the potato filling- 1 1/2 cups of boiled and mashed potatoes
- 1/2 tsp of cumin seeds
- 2 tbsp of finely chopped onions
- 1 tsp of finely chopped ginger
- 1/2 tsp of chilly powder
- 1/4 tsp of turmeric powder
- A pinch of asafoetida
- A tbsp of finely chopped coriander leaves
- 1 tbsp of oil
- Salt to taste
For the sandwich
- 6 pieces of bread
- Butter as required
Method
![]()
- In a pan heat up oil. Add in cumin seeds and wait for it to start sizzling. Reduce the heat to medium low.
- Add the onions and ginger. Sprinkle salt. Sauté it until the onions turn tender.
- Now add the turmeric powder, asafoetida and chilly powder. Quickly stir it and add mashed potatoes and coriander leaves . Mix it all well. Cook for about two minutes and turn off the heat.
- Sandwich the required masala in between two bread slices. Apply butter on both sides of the sandwich.
- Heat a thick bottom skillet / tava . Once hot, Place the sandwich on it and apply pressure using a spatula . Cook for about a minute and then flip. Apply pressure using the spatula and cook for another minute.
- Remove it from the heat and serve hot with some ketchup.
Tips
- The filling should be more paste like with minimum water content. Else the bread would get soggy.
- I used red chilly powder to avoid bitting into green chillies. You could use green chillies if you wish to.
![]()
↧